 |
| Recent Topics |
|
|
|
| Who is Online |
|
In total there are 365 users online :: 0 Registered, 0 Hidden and 365 Guests
Registered Users: None
[ View complete list ]
Most users ever online was 604 on Sun Jul 21, 2019 1:26 am
|
|
|
 |
| Author |
Message |
Piers14
TDC Committee Member

Joined: 31 Jan 2009
Posts: 2048
Location: Leopardstown, Dublin |
|
 The Basics of Autotesting The Basics of Autotesting |
 |
The Basics of Autotesting:
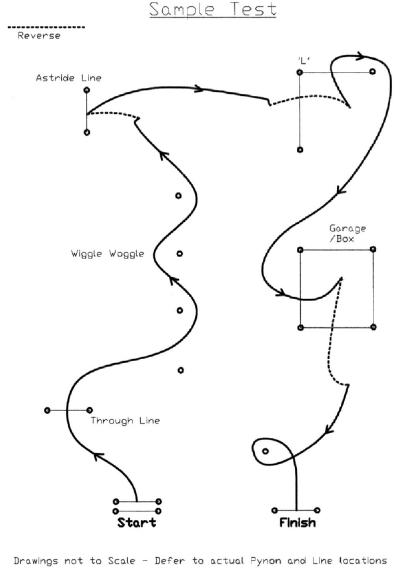
The aim is to manoeuvre a car around a set of pylons (cones), to a set route in as short a time as possible. Whoever is quickest through the tests of the day is the winner.
At sign-on you will be given copies of the tests, usually 3 or 4 depending on the space available. The idea is to complete 12 tests performing 3 tests 4 times or 4 tests 3 times. There will be plenty of time to walk the tests in advance.
Walking the Tests
The most common way to learn the tests is to walk them. In advance of walking a test, stand at the start line (denoted by double parallel lines) and take note of how many obstacles/pylons there are. These will consist of lines, garage/boxes, single pylons, ‘L’s or wiggle woggles (rows of pylons you have to navigate through).
Once you are oriented and you know where all the obstacles are, start walking the test. Its best to break up the tests into three logical sectors, the beginning, the middle and the end. When walking the test, walk it as if you are driving i.e. walk backwards for the reversing portions of the test and imagine yourself pulling the handbrake etc.
Begin with walking the first sector (following the test diagram) then restart and include the second sector and finally the full test. Perform this a number of times until you can walk it without referring to the test diagram. As you gain experience, you become more familiar with the manoeuvres, and will be able to learn the tests more quickly.
When driving on the tests you will come across many different manoeuvres but the key ones are: -
1. Pylon circling.
2. Reverse flick.
3. Nose throws.
4. Stop astride lines.

Circling a Pylon
This will require a handbrake turn.
Front Wheel Drive (FWD): You accelerate with as little wheelspin as possible towards the pylon and brake hard while avoiding the urge to depress the clutch. You are braking the engine as well as the car and need to reduce your speed to 5 mph as you reach the pylon before quickly applying full lock followed by pulling the handbrake hard while applying the throttle to keep forward motion. With the rear wheels locked, the tail of the car will swing out away from the pylon. The handbrake should be modulated once the tail of the car has started to slide, as most saloons will continue to slide once set in motion. Power should be applied to accelerate away from the manoeuvre and on to the next element of the test.
Reverse Flick (J-Turn)
This manoeuvre is required when you wish to change direction from reverse to forward. You need to gain as much speed as possible before beginning this manoeuvre.
FWD - Approaching the flick accelerating hard in reverse gear you should wind on lock (Clockwise) as fast as possible with full throttle applied as you do this. Keep your foot on the throttle and as fast as possible wind off the lock to the straight ahead position and as the front of the car completes about 120 degrees of turn, drop the clutch, grab first gear and apply the power hard. There should be no need to touch the handbrake or brakes.
Nose throws
This manoeuvre is required when you wish to throw onto or through a line in reverse.
FWD - As you approach the line you will need to turn the steering wheel clockwise quickly approximately a third of a turn and not full lock as you may imagine. Follow this by applying the handbrake hard while applying full power. Keep the handbrake locked with power applied, wind off the steering lock until the car had reached the desired position. Then brake hard in order to lock the front wheels, depress the clutch and select reverse gear. This will enable you to select reverse gear without grinding the gears. As you approach the line in reverse and if you need to stop astride the line (with the rear wheels over the line) lock the brakes again in order to allow the rear wheels to pass over the line, depress the clutch and select first gear. Power should be applied to accelerate away from the manoeuvre and on to the next element of the test.
Stop astride lines
Stopping astride a line means placing either the front wheels (if going forward) or the rear wheels (if reversing) across a line. All tests end with positioning the front wheels across the line (astride).
|
|
| Tue Jun 16, 2009 6:08 pm |
  |
 |
|
|
You cannot post new topics in this forum
You cannot reply to topics in this forum
You cannot edit your posts in this forum
You cannot delete your posts in this forum
You cannot vote in polls in this forum
|
|  |
Powered by phpBB © 2001, 2015 phpBB Group
|
|
